Automation Testing
Tips, Tricks and Downloads related to the Automation of Tests for Software. Covering CodedUI and Automated Testing news, providing Automation Testing Tutorials and How-To's
Thursday 24 May 2012
How Google Tests Software
Google, who's user base has been estimated as high as 1.5 billion accross it's suite of products by some, and who's products dominate the internet, recently released a new book "How Google Tests Software" revealing exactly how Google tests software, offering brand-new best practices.
Authors James Whittaker, Jason Arbon and Jeff Carollo offer the folowing insights on testing at Google:
On how testing at Google is different from Microsoft:
"At Google, testing is owned by everyone on the development team. Developers have to take responsibility for their unit tests and testers take responsibility for making developers productive testers. It’s not a dev-test model; everyone is a tester at Google."
On testing Web based Software Vs. All Other Types the Authors point out that all software is created equal, accepting input, producint output, storing data, and doing computation. Google utiliazes crowd source testing to great effect, at the end of the day the same problems are universal in testing.
According to the book Google beleives that testers are much more effective when also being able to code, expanding their impact. Another huge part of testing at Google involves having the developers perform self-service testing (described in the book).
As far as security is concerned, the Authors reflect that horizontals like security apply everywhere, but require special knowledge and skillset.
Google Tests Software is great book which will benifit Automated Testers, Dev, and Program Management, contains real code, and talks about real automation efforts. The book is available from Amazon Here.
Tuesday 6 December 2011
Running Tests from Visual Studio vs. A Remote Computer
Test Controller / Agent Setup
First you’ll need a free computer or virtual machine to install the MS Test Controller and Test Agent software on.
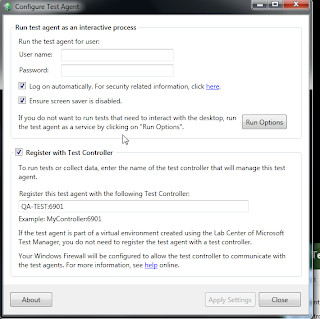
Here are the settings I’ve used for the Test Controller and Test Agent(I’ve registered the Test Agent against the Test Controller which is on the same machine):


Visual Studio Setup
Now in Visual Studio you will need to configure alternative test settings to use for running tests remotely. To edit test settings go to Test >> Edit Test Settings >> Trace and Test Impact. You can toggle between test settings used by going to Test >> Select Active Test Settings in Visual Studio. Under Roles add the name of the machine you’ve installed the Test Controller on, in my example I’ve used my QA-Test machine:

And that’s it, you’re now free of sitting and watching tests run.
Friday 2 September 2011
CodedUI Testing Automation - Assertions for Values that Change
UIMap.OpenInventoryModule();
UIMap.OpenInventoryItem();
int origSkuQty = Convert.ToInt32(UIMap.UIWindow.UIInStockCustom.UIItemText.DisplayText);
For this to work i've dropped the CodedUI assertion picker on the DisplayText property of my inventory item and added this to my UIMap to call during the test.
After my sale I perform the same inventory check and verify that the DisplayText int is now the origSkuQty - 1
Thursday 12 May 2011
Tool - Inspect Objects
Inspect Objects is part of the Windows SDK and available here:
More on Inspect Objects from Microsoft:
http://msdn.microsoft.com/en-us/library/ms696079%28v=vs.85%29.aspx
Monday 9 May 2011
Microsoft CodedUI Tip - Kill Unwanted Processes During MyTestInitialize
MyTestInitialize allows you to run some code before the test starts, from MyTestInitialize i call my process kill.
     public void MyTestInitialize()
     {
       // To generate code for this test, select "Generate Code for Coded UI Test" from the shortcut menu and select one of the menu items.
       // For more information on generated code, see http://go.microsoft.com/fwlink/?LinkId=179463
       TerminateProcess.YerOuttaHere();
     }
The kill process uses System.Diagnostics and kills any notepad process.
 using System;
 using System.Threading;
 using System.Diagnostics;
 public class TerminateProcess
 {
   public static void YerOuttaHere()
   {
     Process[] processes = Process.GetProcessesByName("notepad");
     foreach (Process process in processes)
     {
       process.Kill();
       process.WaitForExit();
     }
   }
 }
Friday 6 May 2011
The Perfect UI Automation Testing Software Testing Process
Recording a test
I setup my test recorder and open my application, for my test i click through my application, open a report and view some data, I make a change and close out, I'm prompted for a name for the test and save.
Tweaking the Recording
The video step editor window opens, i set a few quick ignore zones in my app for dynamic items and save. I check the performance baselines and set my thresholds for when the test should fail. I set global change ignore zones for my application. I can also reverse my assertions and only select certain places in the video i would like to monitor through the test runs. The Software learns what to focus on.
Test Steps
A list of test steps are auto generated based on previous test steps I've setup using the smart match test step feature and my test case is complete.
Running Tests
I select my tests and hit run on new build, with every new build my app auto installs and test cases run.
Error Reporting
When a mismatch is found in my test the test fails generating a report containing the video section that no longer matches, I can choose to update my test to the new visual or report the bug.
Future Test Creation is Automated
As the testing software learns my testing habits it develops new tests and new combinations of tests based on what I’ve set it to focus on, tests are automatically adapted as the software changes based on my approval. I sit back and monitor, all of the new testing, test runs, and issue tracking are handled by the intelligent software. I send emails from the beach.
Assert two screenshots hack in Visual Studio Test
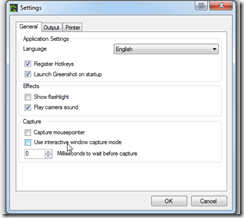
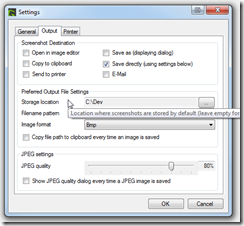
I set up Greenshot to dump a full screenshot automatically to a folder on each of my test machines without opening the image, here’s the settings I used:


During the test run Greenshot will snap a full desktop image and dump it to a directory on the test machine, I’ll later crop the image during the test and compare.
Comparing screenshots
Inside of the test file I have 2 Bitmap images, 1.bmp which is my baseline image and the dynamic screenshot(2.bmp) of my application taken during the test(this screenshot is also taken during the test using the Greenshot hotkey control+Print Screen in my app window).
CheckImages.cs file:
 //images to compare after taking screenshot
 //baseline
 Bitmap bmp1 = new Bitmap(@"C:\Dev\1.bmp");
 //new screenshot
 Bitmap bmp2 = new Bitmap(@"C:\Dev\2.bmp");
 //crop the image x, y, width, height and then compare
 Bitmap cropbmp1 = ComparingImages.CropBitmap(bmp1, 220, 200, 600, 200);
 Bitmap cropbmp2 = ComparingImages.CropBitmap(bmp2, 220, 200, 600, 200);
 ComparingImages.Compare(cropbmp1, cropbmp2);
Cropping The Image
I found a simple function to crop the image, In my case I’m interested in a screenshot of a grid full of data.
 public Bitmap CropBitmap(Bitmap bitmap, int cropX, int cropY, int cropWidth, int cropHeight)
 {
 Rectangle rect = new Rectangle(cropX, cropY, cropWidth, cropHeight);
 Bitmap cropped = bitmap.Clone(rect, bitmap.PixelFormat);
 return cropped;
 }
Comparing The HashI found some code here which works perfectly for taking the two images and comparing the Hash of each, you can read more on the details of how it works here, I’m just happy that it works.
CompareHash.cs file:
 using System;
 using System.Collections.Generic;
 using System.Linq;
 using System.Text;
 using System.Drawing;
 using System.Security.Cryptography;
 using Microsoft.VisualStudio.TestTools.UITesting;
 using Microsoft.VisualStudio.TestTools.UnitTesting;
 using Microsoft.VisualStudio.TestTools.UITest.Extension;
 using Keyboard = Microsoft.VisualStudio.TestTools.UITesting.Keyboard;
 namespace CoreTestAutomation.Extended_Tests.Screen_Checks
 {
   public class ComparingImages
   {
     public static Bitmap CropBitmap(Bitmap bitmap, int cropX, int cropY, int cropWidth, int cropHeight)
     {
       Rectangle rect = new Rectangle(cropX, cropY, cropWidth, cropHeight);
       Bitmap cropped = bitmap.Clone(rect, bitmap.PixelFormat);
       return cropped;
     }
     public enum CompareResult
     {
       ciCompareOk,
       ciPixelMismatch,
       ciSizeMismatch
     };
     public static CompareResult Compare(Bitmap bmp1, Bitmap bmp2)
     {
       CompareResult cr = CompareResult.ciCompareOk;
       CompareResult crmatch = CompareResult.ciCompareOk;
         //Convert eachciCompareOk image to a byte array
         System.Drawing.ImageConverter ic = new System.Drawing.ImageConverter();
         byte[] btImage1 = new byte[1];
         btImage1 = (byte[])ic.ConvertTo(bmp1, btImage1.GetType());
         byte[] btImage2 = new byte[1];
         btImage2 = (byte[])ic.ConvertTo(bmp2, btImage2.GetType());
         //Compute a hash for each image
         SHA256Managed shaM = new SHA256Managed();
         byte[] hash1 = shaM.ComputeHash(btImage1);
         byte[] hash2 = shaM.ComputeHash(btImage2);
         //Compare the hash values
         for (int i = 0; i < hash1.Length && i < hash2.Length
                  && cr == CompareResult.ciCompareOk; i++)
         {
           if (hash1[i] != hash2[i])
             cr = CompareResult.ciPixelMismatch;
         }
         Assert.AreEqual(crmatch, cr);
         return cr;
     }
   }
 }
That's it, now i have a quick workaround to comparing some visual aspects of my application under test.
