Tuesday 6 December 2011

Running Tests from Visual Studio vs. A Remote Computer

 Here’s a tip for running tests that will free up your machine from running tests out of Visual Studio.

Test Controller / Agent Setup

First you’ll need a free computer or virtual machine to install the MS Test Controller and Test Agent software on.

Here are the settings I’ve used for the Test Controller and Test Agent(I’ve registered the Test Agent against the Test Controller which is on the same machine):


Visual Studio Setup

Now in Visual Studio you will need to configure alternative test settings to use for running tests remotely. To edit test settings go to Test >> Edit Test Settings >> Trace and Test Impact. You can toggle between test settings used by going to Test >> Select Active Test Settings in Visual Studio.  Under Roles add the name of the machine you’ve installed the Test Controller on, in my example I’ve used my QA-Test machine:


And that’s it, you’re now free of sitting and watching tests run.

Friday 2 September 2011

CodedUI Testing Automation - Assertions for Values that Change

I've found a few situations during testing where I have the need to place assertions on values that are always changing, for example during one of my tests I sell inventory products and need to verify that the quantity in the inventory reduces after the sale is processed. This is pretty easy to do, first I open my inventory item and get the quantity value from a display text property, then convert it to an integer.

UIMap.OpenInventoryModule();
UIMap.OpenInventoryItem();
int origSkuQty = Convert.ToInt32(UIMap.UIWindow.UIInStockCustom.UIItemText.DisplayText);

For this to work i've dropped the CodedUI assertion picker on the DisplayText property of my inventory item and added this to my UIMap to call during the test.

After my sale I perform the same inventory check and verify that the DisplayText int is now the origSkuQty - 1

Thursday 12 May 2011

Tool - Inspect Objects

I've been using UISpy for some time to check the properties of my app under test, Inspect Objects is a newer tool and is able to find some controls not available in UISpy.

Inspect Objects is part of the Windows SDK and available here:


More on Inspect Objects from Microsoft:

http://msdn.microsoft.com/en-us/library/ms696079%28v=vs.85%29.aspx

Monday 9 May 2011

Microsoft CodedUI Tip - Kill Unwanted Processes During MyTestInitialize

Here's a quick way to kill any unwanted processes that may be running before your test starts, in my case I'm targeting any notepad applications that may be open.

MyTestInitialize allows you to run some code before the test starts, from MyTestInitialize i call my process kill.

     public void MyTestInitialize()  
     {  
       // To generate code for this test, select "Generate Code for Coded UI Test" from the shortcut menu and select one of the menu items.  
       // For more information on generated code, see http://go.microsoft.com/fwlink/?LinkId=179463  
       TerminateProcess.YerOuttaHere();  
     }  

The kill process uses System.Diagnostics and kills any notepad process.


 using System;  
 using System.Threading;  
 using System.Diagnostics;  
 public class TerminateProcess  
 {  
   public static void YerOuttaHere()  
   {  
     Process[] processes = Process.GetProcessesByName("notepad");  
     foreach (Process process in processes)  
     {  
       process.Kill();  
       process.WaitForExit();  
     }  
   }  
 }  

Friday 6 May 2011

The Perfect UI Automation Testing Software Testing Process


Recording a test

I setup my test recorder and open my application, for my test i click through my application, open a report and view some data, I make a change and close out, I'm prompted for a name for the test and save.


Tweaking the Recording

The video step editor window opens, i set a few quick ignore zones in my app for dynamic items and save. I check the performance baselines and set my thresholds for when the test should fail. I set global change ignore zones for my application. I can also reverse my assertions and only select certain places in the video i would like to monitor through the test runs. The Software learns what to focus on.


Test Steps

A list of test steps are auto generated based on previous test steps I've setup using the smart match test step feature and my test case is complete.


Running Tests

I select my tests and hit run on new build, with every new build my app auto installs and test cases run.


Error Reporting

When a mismatch is found in my test the test fails generating a report containing the video section that no longer matches, I can choose to update my test to the new visual or report the bug.


Future Test Creation is Automated

As the testing software learns my testing habits it develops new tests and new combinations of tests based on what I’ve set it to focus on, tests are automatically adapted as the software changes based on my approval. I sit back and monitor, all of the new testing, test runs, and issue tracking are handled by the intelligent software. I send emails from the beach.

Assert two screenshots hack in Visual Studio Test

Here’s a workaround I came up with when trying to find a way to have visual comparisons during some of my tests. I’m using the free screenshot program Greenshot available from here to take care of my screenshots.

I set up Greenshot to dump a full screenshot automatically to a folder on each of my test machines without opening the image, here’s the settings I used:

GreenShot Settings1GreenShot Settings2

During the test run Greenshot will snap a full desktop image and dump it to a directory on the test machine, I’ll later crop the image during the test and compare. 


Comparing screenshots

Inside of the test file I have 2 Bitmap images, 1.bmp which is my baseline image and the dynamic screenshot(2.bmp) of my application taken during the test(this screenshot is also taken during the test using the Greenshot hotkey control+Print Screen in my app window).


CheckImages.cs file:

 //images to compare after taking screenshot  
 //baseline  
 Bitmap bmp1 = new Bitmap(@"C:\Dev\1.bmp");  
 //new screenshot  
 Bitmap bmp2 = new Bitmap(@"C:\Dev\2.bmp");  
 //crop the image x, y, width, height and then compare  
 Bitmap cropbmp1 = ComparingImages.CropBitmap(bmp1, 220, 200, 600, 200);  
 Bitmap cropbmp2 = ComparingImages.CropBitmap(bmp2, 220, 200, 600, 200);  
 ComparingImages.Compare(cropbmp1, cropbmp2);  


Cropping The Image

I found a simple function to crop the image, In my case I’m interested in a screenshot of a grid full of data.


 public Bitmap CropBitmap(Bitmap bitmap, int cropX, int cropY, int cropWidth, int cropHeight)  
 {  
 Rectangle rect = new Rectangle(cropX, cropY, cropWidth, cropHeight);  
 Bitmap cropped = bitmap.Clone(rect, bitmap.PixelFormat);  
 return cropped;  
 }  


Comparing The Hash

I found some code here which works perfectly for taking the two images and comparing the Hash of each, you can read more on the details of how it works here, I’m just happy that it works.


CompareHash.cs file:
 using System;  
 using System.Collections.Generic;  
 using System.Linq;  
 using System.Text;  
 using System.Drawing;  
 using System.Security.Cryptography;  
 using Microsoft.VisualStudio.TestTools.UITesting;  
 using Microsoft.VisualStudio.TestTools.UnitTesting;  
 using Microsoft.VisualStudio.TestTools.UITest.Extension;  
 using Keyboard = Microsoft.VisualStudio.TestTools.UITesting.Keyboard;  
 namespace CoreTestAutomation.Extended_Tests.Screen_Checks  
 {  
   public class ComparingImages  
   {  
     public static Bitmap CropBitmap(Bitmap bitmap, int cropX, int cropY, int cropWidth, int cropHeight)  
     {  
       Rectangle rect = new Rectangle(cropX, cropY, cropWidth, cropHeight);  
       Bitmap cropped = bitmap.Clone(rect, bitmap.PixelFormat);  
       return cropped;  
     }  
     public enum CompareResult  
     {  
       ciCompareOk,  
       ciPixelMismatch,  
       ciSizeMismatch  
     };  
     public static CompareResult Compare(Bitmap bmp1, Bitmap bmp2)  
     {  
       CompareResult cr = CompareResult.ciCompareOk;  
       CompareResult crmatch = CompareResult.ciCompareOk;  
         //Convert eachciCompareOk image to a byte array  
         System.Drawing.ImageConverter ic = new System.Drawing.ImageConverter();  
         byte[] btImage1 = new byte[1];  
         btImage1 = (byte[])ic.ConvertTo(bmp1, btImage1.GetType());  
         byte[] btImage2 = new byte[1];  
         btImage2 = (byte[])ic.ConvertTo(bmp2, btImage2.GetType());  
         //Compute a hash for each image  
         SHA256Managed shaM = new SHA256Managed();  
         byte[] hash1 = shaM.ComputeHash(btImage1);  
         byte[] hash2 = shaM.ComputeHash(btImage2);  
         //Compare the hash values  
         for (int i = 0; i < hash1.Length && i < hash2.Length  
                  && cr == CompareResult.ciCompareOk; i++)  
         {  
           if (hash1[i] != hash2[i])  
             cr = CompareResult.ciPixelMismatch;  
         }  
         Assert.AreEqual(crmatch, cr);  
         return cr;  
     }  
   }  
 }  


That's it, now i have a quick workaround to comparing some visual aspects of my application under test.

Thursday 5 May 2011

Telerik Test Studio – My Quick Evaluation (Recording)

Recording Demo of the new Test Studio Version 1011.1.502.0 product offered from Telerik.

Test Recording

Setting up a new project is easy; I’m given a choice of two test types, Web Test and WPF Test, for my first demo I select Web Test.

Hitting record in the Test Studio window opens a new IE window. I’m presented with a toolbar containing recording options attached to the browser 


For my first recorded step I navigate to Google.ca, a new step is added to the Steps window in Test Studio where properties for this step can be edited. I also have the option of customizing this step in code (C#)

Choosing this options open a code editor window:

I’d definitely prefer using Visual Studio for editing code; I am able to also open the tests from Visual Studio so I don’t think configuring VS as my editor will be a problem.

Features!

One really slick feature is the hover feature, hovering over an element brings up a window with various options, including mouse actions, JavaScript events, drag and drop, validation. This is probably my favorite feature so far. 

I add image validation to the Google “I’m Feeling Lucky” button hit ok and verifying the image is dropped in my list of steps.


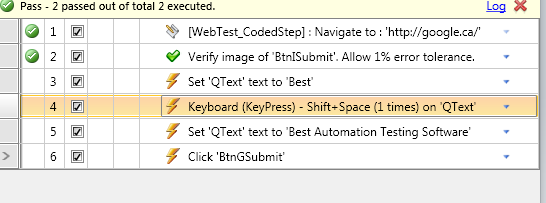
 For my next step I search Google for “Best Automation Testing Software” and verify the first search result returned.

I notice that the step editor has added a couple of unnecessary steps during entering text, step 3 and 4 below. I’ll have to manually delete these steps.


Text verification is easy and I’m offered a variety of options to choose from, I’ll just text the text contains what I’m looking for:


We’ll hit save and wrap this test up. For simplicity of recording I definitely give Test Studio the edge over any other tools I’ve used, having quick access to the recording menus (assertions, actions, etc.) and having the ability to playback a test during the recording process is a big productivity booster.

Features I like:

-    Element highlighting while recording
-     The variety of options available from the hover over highlighting menu (quick assertions)
-    Test playback ability during the recording process!
-    The step editor window

What could be improved?

-    The code editor, I’d prefer to use VS. This may just mean figuring out how to edit code in VS
-    Adding junk actions to the step editor, however these unnecessary steps were easy to remove.

Summary: Telerik offers a good tool with some really cool features aimed at the novice tester, easy to use and learn. I could see dropping this tool into someones hands with no coding experience and having them with a suite of tests by the end of the day.


Tuesday 3 May 2011

Testing with Visual Studio Test - Playback failed - using generic search properties

If you do automation testing with Visual Studio you're likely to come across the "playback failed to find the control with the given search properties" error message for a control or window that has changing search properties.

 Here's an example and how you can make the search more generic for a better match: Here I'm using the test recorder to record entering some text to a new notepad file named "My File 2423.....txt". This works fine on playback so long as the file name doesn't change.


Double click your UIMap in Visual Studio to open up the UIMap design and navigate to the control we're going to edit.  Taking a look at the search properties generated below the search must match the file name, this causes problems if this file name changes or is dynamically generated.

UIMap search properties are customizable, we can fix this problem by making the search a bit more generic, in this case I'll have the search match contains "My File" and skip the other stuff.


Here I've renamed my notepad window to retest using the new search configuration, from within the UIMap editor a quick right click search:


Playback finds the newly named file "My File Changed.txt"